Running and Drinking Water
 Running and drinking water
Running and drinking water or other fluids can be a bit stressful. Lots of questions arise such as how do you carry your fluids, what sort of containers, how much fluid and so on.
Well fear not, as this guide will give you various options to suit your situation and fluid needs, plus my 2 favorite techniques for running and drinking water from a cup during a race.
Do you need to carry water?
When deciding whether to carry water on your training runs and races, you need to take various things into account:
- The outside temperature and how much you sweat. How to calculate how much you sweat.
- How long will your run be. For any run over an hour, you should consider having access to fluids.
- Will you have access to water during your run such as public drinking taps.
- If racing, how often are the water stations.
- Is carrying water going to be a help or a hindrance.
Look at any group of runners and you will see a variety of ways for carrying water. Let's look at each option.
Handheld Bottle
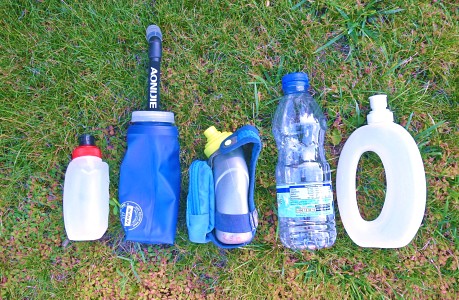
For shorter runs, running and drinking water holding a bottle is perfectly doable. Some people just use a regular supermarket water bottle and others opt for a sports bottle. Think about:
The size and shape of the bottle. You need to be able to hold it comfortably with a secure grip. Too fat and it will slip out of your hand and too big and it will be too heavy. Most people favor one hand over the other, however this can also mean that your body becomes off balance. Try swapping hands from time to time (if you can).
Holding the bottle. Recently there has been a surge in hand bottle holders. These are usually a strap or mesh that fits around your bottle and then you slip your hand through the holder. These are great for taking the weight off your hand and to stop your fingers getting tired from over gripping. The Handiwear bottle grip is a good option and is not expensive.
The lid of the bottle. Ordinary screw top bottles (like you get in the supermarket), need unscrewing so not always convenient. However they tend to be pretty secure from leakages. Sports bottles will have a sport lid with a valve. You simply pull up the valve to open it and push it down to shut it. These are quick and handy to use but some can leak. Another option is the race valve which opens when you suck or squeeze it, like in the Nathan quick shot.
The terrain. Carrying a bottle in your hand whilst running on technical terrain can be dangerous. Firstly, the bottle can leave you off balance and secondly, if you trip your hand is not available to help break your fall.
Hydration Waist Belt
If you don't like the idea of running and drinking water from a handheld bottle then consider a hydration waist belt. Hydration belts usually come with anything from 1 - 4 bottles plus a pocket for extras such as keys, phone, gels, tissues. You can carry more water around your waist than in a single handheld bottle, so hydration belts are a better option for longer runs. Your hands and arms are also free so you have better balance and arm swing motion. Think about:
The size of the water bottles. If you are small framed or have slim hips, choose smaller bottles to avoid the belt being dragged down. Some of the cheaper belts tend to have cheap bottles that leak or the sports caps are difficult to open, so check out the reviews. However, replacement bottles are usually easy to find. Whether to go for one large bottle or say 2 smaller ones is personal preference, although some people feel weighted down with just one large bottle.
The size of the water belt. Some belts are just too large for smaller, female frames. Measure carefully as you want the belt to sit snugly around your waist (roughly on your belly button line). Look at the compartments for all your little extras and see if that suits you. If your have a large phone, make sure it fits.
The material. Most hydration running belts are made of soft material know as Neoprene. Check if it is waterproof especially if you will be carrying your phone and look for extras such as a energy gel loops, bib number holder toggles and reflective elements.
Hydration Vest
A hydration vest is taking carrying fluids to the next level when it comes to running and drinking water. Not only can they carry fluids but there are usually other compartments for your jacket, phone, food and so on. Hydration vests are often a must for long trail runs and long races where water is not so available. Think about:
The carrying capacity. Hydration vests will describe their space capacity (usually in litres) which can be anything from 5L to 15L and upwards. Note that the space capacity is the total space and not just the amount of fluids it can carry. So a 5L vest might have space for 1L of water and 4L of extras. The more the capacity, the bulkier the vest, so decided if you want it mainly for fluids or do you want to add clothing, food and so on.
Water bottles or Water Bladder. Hydration vests will either have a space at the back for a water pouch/bladder (usually 1 - 2L) and/or front chest pockets for water bottles. The water bottles can be hard or soft and can usually hold from 150-500ml. Check the information on your vest to see what the pockets can hold. Soft water bottles are gaining in popularity as they are light and collapse down on themselves as they empty. However, they can also be tricky to insert into the pocket and you need to make sure they are secure so they don't fall out.
Refilling and Practicality. Refilling a water pouch/bladder involves taking the vest off to access it, so not ideal in a race situation. However once in place, it does feel secure. Water bottles are much easier to fill and have the advantage of you being able to put different fluids in each bottle. However you need to make sure they are well secured in the pocket (there is usually a loop) and you can feel off balance if one bottle is empty and the other is full.
Comfort. Your hydration vest should fit snugly and securely but you don't want any areas that rub (the neck and lower back are often hot spots). Some manufacturers sell vests in different sizes so this might be useful for larger or smaller framed runners.
Rely on Water being available en route
During training, depending on where you do your runs, you may have access to public water taps or other clean water drinking sources. This can be a great option but only if you are sure that the water source will still be functioning on the day that you need it.
During a race, the race details will usually tell you in advance how often there will be a drinks stop. Decide if this suits you. Many people running a marathon worry about this, especially since cups are now used rather than bottles of water. Drinking from a cup whilst on the move takes practice and a bit of clever thinking.
2 techniques for running and drinking water from a cup in a race:
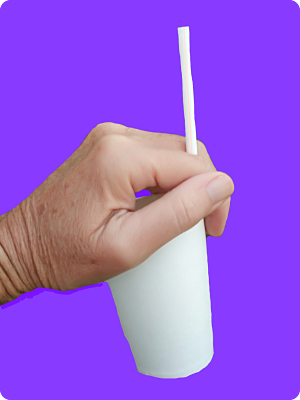 Cup & Straw Method
Technique #1
Carry a straw with you tucked int your shorts or wherever you can. As you grab a cup, place your hand over the top of the cup to stop water jumping out and pop in the straw between your fingers. Place the straw to the side of your mouth so that the fluids are sucked into your cheek area rather than straight down you throat. This will help stop possible choking.
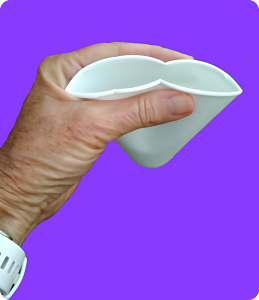 Cup squeeze method
Technique #2
Paper cups are better than plastic for this method. Hold your hand as if about to give a handshake and grab the cup as near to the top as you can. Immediately squeeze the top of the cup with your fingers and thumb so that it collapses inwards. This will firstly stop the water sloshing out of the cup and secondly it will create a spout for you to drink from. Pour the water into the side of your mouth before swallowing to help avoid choking.
